


Leadleds Bus Led Sign Route Info Electronic Message Board with LCD Message Controller DC9 to 36V
SKU:
LLDP475-LCD32128R
$527.00
Couldn't load pickup availability
📦⏱Order Hand Time:5 ~ 7 business days, the shipping time is estimated at 3~ 7 days to arrive at your door.

Leadleds Bus Led Sign Route Info Electronic Message Board with LCD Message Controller DC9 to 36V
$527.00
The most popular bus LED signs, which are in front of a bus display the route and stop information, LAN to update messages, by the LCD controller to select your custom message.
Easy way to store Your Messages, press the Buttons to assign message display instantly!
Item No.: LLDP475-LCD32128RGB
Dot-matrix: 32x128
Pitch: 4.75mm
Display area: 608 X152mm( L24" X H6")
Led bus sign frame dimensions: 638 x182 x 55mm (25.2 x 7.1 x 2.2 inches)
Input voltage: DC9-36V
Enclosure: Black aluminum alloy frame
Installation Method: by screws and hooks
Display Color: 7 Colors
Communication way: LAN
Nonwaterproof
High-quality bus LED sign, shockproof design, over-current protection, over-voltage protection, under-voltage protection, and short-circuit protection.
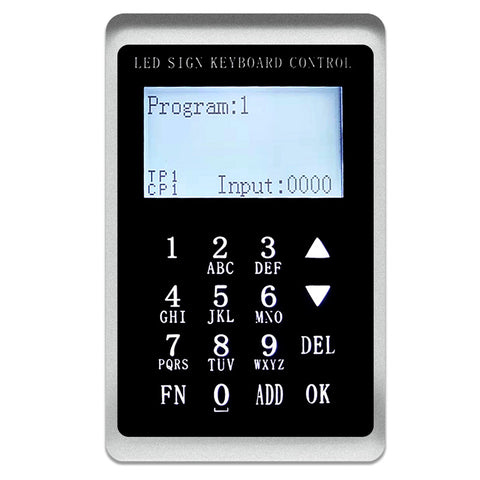
LCD Keypad functions introduction.
1. Directional and numeric keys
2. Brightness setting
3. Power-off saving
4. Language setting
5. Buzzer setting
6. Baud rate setting and synchronization function setting
1. Direction key:
Click UP Switch the program up, and Click DOWN Switch down the program.
Numerical key:
Click 5 + OK Select Play program 5, Click 5+6 + OK, and select Play program 56.
2. Brightness Settings:
Click FN Enter the function Settings interface, Select the brightness setting option, Click OK Go to the Brightness Adjustment page, Click again UP, and DOWN Increase or decrease brightness.
Or click 6 +OK Adjust to Brightness 6. Click FN Return to the previous interface.
3. Switch screen:
Select the Go to Switch Screen option, Click OK Click UP, and DOWN Switch on and off screen options. Click FN Return to the previous interface.
4. Save without power
When the led sign is turned on and powered back on, the selected program will be maintained.
5. Language Settings:
Support Chinese, English, and traditional three languages, Select the language settings and click OK to enter, Click UP and DOWN to Switch languages, and Click OK to Select the language. Then wait to power up again.
6. Buzzer Settings
There will be a dripping sound every time the button is turned on, and there will be no after it is turned off.
7. Baud rate setting
Switch to the baud rate setting option. Click OK, Click again UP and DOWN Switching baud rate, Last click OK.
8. Setting of the synchronization function
Divided into screen capture synchronization and text synchronization, the text program will display the current program, and the screen capture function will intercept the picture to the keypad. (The size cannot exceed 128x64 points and there is no grayscale.)
9. Edit the program sequence function :
Click the number keys 1+ADD +3 +ADD +5 + OK
Program 1, program 3, and program 5 are played in sequence.
Click the number keys 5+ADD +1 + ADD+ 3+ OK
Program 5, program 1, and program 3 are played in sequence.
