


Leadleds LCD Keyboad for Quickly Select Messages to Display on the LED Screen
Couldn't load pickup availability
📦⏱Order Hand Time:2 ~ 4 business days

Multifunction Keyboard for Messages Selection, ideal for bus led signs, car led signs.
A、Scope of application of keyboard
Valid for Leadleds specified Led Signs
B、Hardware connections
There are two kinds of connection: RS232 serial port connection, and RS485 serial port connection. Keyboard shipments have a default baud rate of 115200bps. Before connecting the keypad, set the serial port baud rate of the control card to 115200bps.

1. RS232 control connection mode:
The keyboard is connected to the 3P line corresponding to the RX, TX, and GND of the serial port of the led signboard's control card.
2. S485 control connection mode:
The keyboard is connected to the 3P line corresponding to the A (D), B (D-), and GND of the serial port of the led sign's control card. (Note: When the keyboard is controlled in RS485 mode, the control card should be replaced with RS485 communication mode).
3. Power supply wiring mode of keyboard power supply:
The button board is connected to the 2P line, the red is connected to the VCC, the black is connected to the GND, and the 5V power supply is connected. The current is less than or equal to 200mA.
C. Program distribution and editing:
Edit the program on the computer through Leadleds led sign software, and save the program to the led display through the serial port, network port, or u disk. Program editing according to the program number to save, through the keyboard to select the need to play the program number.
D. Keyboard function and use.
- The Key is introduced in the following figure
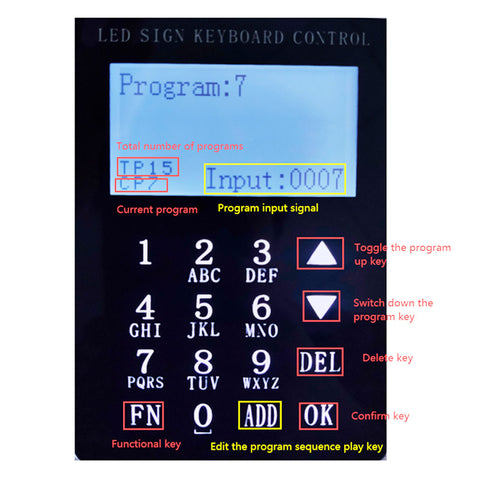
LCD Keypad functions introduction.
1. Directional and numeric keys
2. Brightness setting
3. Power-off saving
4. Language setting
5. Buzzer setting
6. Baud rate setting and synchronization function setting
1. Direction key:
Click UP Switch the program up, and Click DOWN Switch down the program.
Numerical key:
Click 5 + OK Select Play program 5, Click 5+6 + OK, and select Play program 56.
2. Brightness Settings:
Click FN Enter the function Settings interface, Select the brightness setting option, Click OK Go to the Brightness Adjustment page, Click again UP, and DOWN Increase or decrease brightness.
Or click 6 +OK Adjust to Brightness 6. Click FN Return to the previous interface.
3. Switch screen:
Select the Go to Switch Screen option, Click OK Click UP, and DOWN Switch on and off screen options. Click FN Return to the previous interface.
4. Save without power
When the led sign is turned on and powered back on, the selected program will be maintained.
5. Language Settings:
Support Chinese, English, and traditional three languages, Select the language settings and click OK to enter, Click UP and DOWN to Switch languages, and Click OK to Select the language. Then wait to power up again.
6. Buzzer Settings
There will be a dripping sound every time the button is turned on, and there will be no after it is turned off.
7. Baud rate setting
Switch to the baud rate setting option. Click OK, Click again UP and DOWN Switching baud rate, Last click OK.
8. Setting of the synchronization function
Divided into screen capture synchronization and text synchronization, the text program will display the current program, and the screen capture function will intercept the picture to the keypad. (The size cannot exceed 128x64 points and there is no grayscale.)
9. Edit the program sequence function :
Click the number keys 1+ADD +3 +ADD +5 + OK
Program 1, program 3, and program 5 are played in sequence.
Click the number keys 5+ADD +1 + ADD+ 3+ OK
Program 5, program 1, and program 3 are played in sequence.